Seamless Home & Business Wi-Fi setup:
Setup Velop For Make Effortless Connectivity
How To Do Velop Wifi Setup
- Begin by unpacking your Velop nodes and carefully putting them throughout your home. In general, you’ll want to put them in places that give adequate coverage while minimising potential impediments.
- Begin by connecting one Velop node to your modem via an Ethernet connection. Plug the node into an electrical outlet to turn it on.
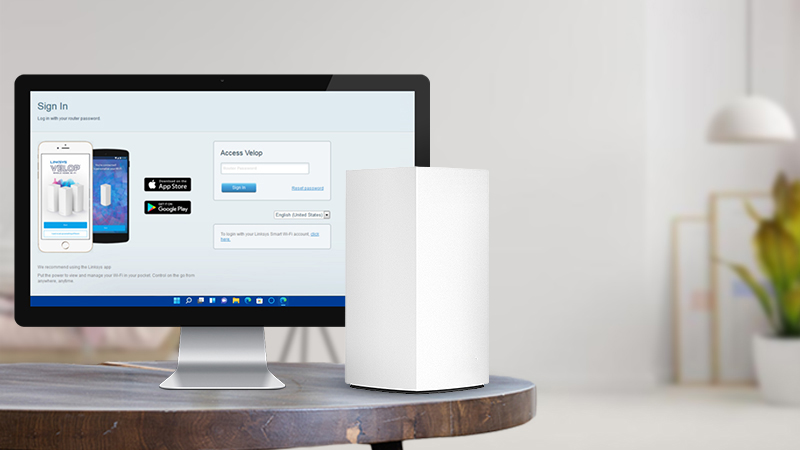
- Connect to the default Wi-Fi network generated by the first Velop node using a computer, smartphone, or tablet. Typically, the network name (SSID) includes “Velop” or a similar identification.
- Open a web browser on your device and enter the Velop node’s default IP address. Typically, this IP is http://192.168.1.1 or http://192.168.0.1. You can also use smartwifi web address for login and then entet your password.
- The online interface will walk you through the velop wifi setup procedure. This may include setting up an administrator password, establishing Wi-Fi network settings and, if necessary, upgrading the firmware.
- If you have supplementary Velop nodes, trail the steps to add them to your network. To optimise coverage, you may be asked to deploy the extra nodes in certain areas.
- The Velop system will automatically set up a mesh network, increasing Wi-Fi coverage across your home. The nodes will interact with one another to guarantee that you may move about freely.
- After configuring the Velop nodes, connect your devices to the newly established Wi-Fi network. Use the SSID and password that you specified during setup.
- While you requested setup without the use of an app, it’s worth mentioning that the app can give extra control tools and make setup even easier. If you change your mind, you may download the app and use it to control your
- Once your Velop system is installed, test the Wi-Fi coverage throughout your home to verify there are no dead spots. You can alter the arrangement of nodes to optimise coverage if necessary.
Execution Of Velop Setup And Login Procedure
Velop is a mesh Wi-Fi system that provides strong and dependable Wi-Fi coverage across your house or workplace. A Velop system is set up in a few steps:
How To Execute Velop Setup Without App?
It may be possible to set up a Velop mesh Wi-Fi system without using the official software, but this will depend on the precise model and firmware version of the Velop system you have. In general, the app is intended to make the velop mesh setup process easier, however the same configuration can normally be accomplished using a web browser interface. Here’s a rough overview of how you may go about it:
- Begin by physically connecting your Velop nodes to electricity as well as to each other through Ethernet connections. Typically, you will connect one node to your modem by Ethernet cable and then connect additional nodes through Ethernet or wirelessly, depending on the design of your system.
- Search for accessible Wi-Fi networks on your PC or mobile device. You should notice a network called “Velop” or something similar. Please connect to this network.
- Launch the browser and type your Velop system’s default IP address or web address which is often http://192.168.1.1 or http://192.168.0.1 and smartwifi.com. Complete the process by entering your password.

- You will be required to provide your login information for the web interface. The default credentials are frequently both “admin” for the username and “admin” for the password for velop login.
- You should be able to configure your Velop system settings using the web interface once you’ve logged in. Creating a new Wi-Fi network name (SSID), defining security, selecting a password, and configuring additional network settings may be required.
- After you’ve made your changes, make sure to save them in the online interface.
- Disconnect from the “Velop” network and return to your usual Wi-Fi network using the new parameters you established.
Access Your Account With myrouter.local
The domain name “myrouter local” is commonly used to access the web-based velop setup interface of routers and other networking devices. This domain name is frequently used in conjunction with Smart Wi-Fi routers to make accessing the router’s settings and configuration page easier.
How Do I Login Into My Velop Router?
- Make sure you’re linked to your Velop network. Connect to the Wi-Fi network that your Velop system is transmitting to do this
- Open a web browser on your device.
- Pass in the IP address of your Velop router in the address bar of your web browser. 192.168.1.1 is frequently used as the default IP address for Velop routers.
- This can, however, change depending on your network arrangement. If 192.168.1.1 fails, try 192.168.0.1 or consult the instructions that comes with your Velop equipment.
- After inputting the IP address and tap on enter key, a login page should display in your browser. You’ll be requested to enter your Velop router’s administrator login and velop setup password.
- If you haven’t transformed the default credentials, you can find them in the Velop documentation or on a sticker on the router.
- You should be able to admittance the router’s web interface after providing the obligatory login credentials.
- You may customise numerous Velop system settings here, such as network settings, security options, device prioritisation, and more.